Ages: 7-11
Contributor:
Orissa Anggita Rinjani
Contributor:
Orissa Anggita Rinjani
Can your children work out the rules for these number patterns?
If you have any useful resources to share, please let us know!
Can your children work out the rules for these number patterns?
If you have any useful resources to share, please let us know!
A great way to get the children in your class on task. Anytime they are on task, producing lovely work, answering a question correctly etc, give them a “prize token” (a bit of blank paper).
They write their name on the piece of paper and put it into the prize jar. Throughout the day, you keep reminding them, “Now, who is doing their work quietly that I can give a prize token” and you’d be surprised how they stop talking and put their heads down and work.
The idea is to get their name in as many times as you can. Give them out EVERY TIME someone does something good. Give out lots, too, and the children get excited when they think they have a good chance at winning the prize.
Finally, at the end of the day, pull out names out of the prize jar. If they have been really good, give out a few more prizes. If they haven’t been that good, warn them that no names may come out of the prize jar if they don’t improve.
Try it. It works a treat!
To get younger children involved in evaluating their work and understanding, I use a smiley face system that each child does on their work at the end of the session…
There’s no writing involved for the children, so it is quick and easy and allows those who are shy or don’t want to speak out to receive help. My children now do this automatically.
Welcome birds into your outdoor areas by following these quick and easy steps to building your very own bird feeder. Could your children make some of these bird feeders and then identify the birds that use it?
This resource could also be used when your children are learning about instruction writing. Can your children find the features of instructions in the text?
Thanks to the Money Matters blog for sharing this resource!
This is a Numeracy Game called “PIG” suitable for Key Stage 2 children (7-11 years).
I find it best played 2v2 to encourage cooperation and joint decision-making. The players have one standard die and they roll to decide who goes first. Players then roll the dice as many times as they like and keep a running total BUT if they throw a number 1, they lose their current score and record zero (which can be easily turned into a pig’s face). This is called getting the PIG. Players can hold their current score by passing on the die to their opponents. An advanced version can be played with two dice, and the two dice are then multiplied – this is called MULTIPIGATION.
This is a great activity for quick addition and also introduces children to probability, i.e. “When is it a good time to hold your score and pass the dice on?”
Players can have five turns each or continue for a certain duration.

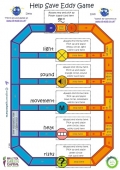
This handy resource includes instructions, a board and question cards to enable your children to play the ‘Electric Eddy Board Game’.
The game helps children to think about energy and electricity and covers the relevant parts of the KS2/3 Science curriculum.
More resources can be found on the Oh Eddy site.
I put all the children’s names into a bag and select one each week to be the class celebrity.
Their name goes on a large piece of paper on the wall, and the other children are encouraged to write positive comments on it. The celebrity also lines up first and doesn’t have to hold doors open or tidy up the classroom.
They all love being the class celebrity and feel very important.
Follow the instructions below to make this beautiful picture frame:

Ingredients:
Method:
1) Cut box so you have four large sides.
2) To cut out the centre, measure accurately the distance from each edge towards the centre and make a mark e.g. if you want a large border, you may measure 10cm from the edge towards the centre all around. Don’t forget that the frame must overlap the picture. If you cut out the centre too big for the picture, the picture will fall out!
3) Join up your marks to form a rectangle within a rectangle and cut out the centre.
4) Cut the mod rock into strips. Make them large enough to overlap and wrap around the whole frame.
5) Moisten the mod rock and get plastering!
6) It is best to do two layers for added strength.
7) Cut out four triangular pieces of card and position them in place at the four corners on the back of the frame to accommodate the size of the picture you are mounting. Moisten some more mod rock and secure the triangles in place. Make sure you leave the inside edge open so you can tuck in the picture
8) For the textured decoration, make sure the mod rock overlaps and extends around the back of the frame; otherwise you will find when it dries, it will fall off!
9) Leave to dry flat.
10) When dry, spray with gold or silver paint for a luxurious antique finish. (handy tip – don’t buy expensive craft paint, pop down to your local car accessory shop and buy some car paint.)
SAFETY – Spray paints should be kept out of the reach of children. The teacher should therefore do the spraying (in a well-ventilated area).
11) If some of your decoration does fall off, you can stick it back on with PVA glue. When it dries, it reacts with the paint and turns a greenish colour which gives the frame an aged effect!
ALTERNATIVELY – Instead of mod rock, you could cut out your frame as per stages 1 – 3. At stage 7, secure triangles on the back with sticky tape. Decorate with dried pasta and pulses. Arrange your decoration as you wish. Stick with PVA glue. When dry, spray gold/silver or a colour of your choice. You can make different-sized frames for postcards or photos and use them for Christmas presents etc.

If the children made a large frame at the beginning of the term, it could be used to display the rest of the year’s artwork in the Art Gallery, saving you the time and effort of sorting and mounting displays!
Little Owl suggested the following variation:
I’m a Brownie Leader, and our group play something similar, but instead of blindfolding a person, we use a die. The corners are numbered 1 to 4, and the children all run around the hall, on a blast of a whistle, they get into any corner. The leader rolls the dice. If a 2 is rolled, then anyone in that corner is out. If a 5 or 6 is rolled, everyone is safe, and the game continues until there is one person left. If the children need to let off a bit more steam, if a 5 or 6 is rolled, anyone that has been previously out can come back into the game, and then the leader/adult decides when to end the game.
Sobz also suggested that:
Get the class to do activities like hopping, crawling, lunges etc, to the corners for a great warm-up. Or if doing themes, pretending to be an animal etc.
Another visitor has tried the game and says:
We played this game in my class, only instead of being out, the children in the corner had to do an activity (10 jumping jacks, 10 sit-ups, 10 wall push-ups).
This game is best played indoors in a hall, and you will need benches.
How to play: