Ages: 7-11
Contributor:
Sellyeve
Contributor:
Sellyeve
The assembly script, available for download below, can be used as part of your Harvest celebrations.
The assembly script, available for download below, can be used as part of your Harvest celebrations.

Digital roots provide some good opportunities for finding patterns. They also reinforce the children’s knowledge of their multiplication tables and can be used to create some visual patterns.
A worksheet with full instructions can be found below. This involves the children working out the digital roots of the numbers in each of the multiplication tables, starting with the one times table, and progressing to the twelve times table.
The following table shows the digital roots of each of the multipication calculations. Some of the lines have similar patterns. Can you spot them?
| 1 | 2 | 3 | 4 | 5 | 6 | 7 | 8 | 9 | 10 | 11 | 12 | |
| 1 | 1 | 2 | 3 | 4 | 5 | 6 | 7 | 8 | 9 | 1 | 2 | 3 |
| 2 | 2 | 4 | 6 | 8 | 1 | 3 | 5 | 7 | 9 | 2 | 4 | 6 |
| 3 | 3 | 6 | 9 | 3 | 6 | 9 | 3 | 6 | 9 | 3 | 6 | 9 |
| 4 | 4 | 8 | 3 | 7 | 2 | 6 | 1 | 5 | 9 | 4 | 8 | 3 |
| 5 | 5 | 1 | 6 | 2 | 7 | 3 | 8 | 4 | 9 | 5 | 1 | 6 |
| 6 | 6 | 3 | 9 | 6 | 3 | 9 | 6 | 3 | 9 | 6 | 3 | 9 |
| 7 | 7 | 5 | 3 | 1 | 8 | 6 | 4 | 2 | 9 | 7 | 5 | 3 |
| 8 | 8 | 7 | 6 | 5 | 4 | 3 | 2 | 1 | 9 | 8 | 7 | 6 |
| 9 | 9 | 9 | 9 | 9 | 9 | 9 | 9 | 9 | 9 | 9 | 9 | 9 |
| 10 | 1 | 2 | 3 | 4 | 5 | 6 | 7 | 8 | 9 | 1 | 2 | 3 |
| 11 | 2 | 4 | 6 | 8 | 1 | 3 | 5 | 7 | 9 | 2 | 4 | 6 |
| 12 | 3 | 6 | 9 | 3 | 6 | 9 | 3 | 6 | 9 | 3 | 6 | 9 |
When you have worked out the digital roots of each of the multiplication sums, you can make some interesting visual patterns.
All that you need is the following diagram. You will need one for each multiplication table that you want to draw the pattern for. A page of these diagrams (with six on each page) can be found below, for you to print and photocopy.

Choose your multiplication table (e.g. 5 times table), and make a list of the digital roots (if you haven’t done this already):
5 1 6 2 7 3 8 4 9 5 1 6
Look at the first number – find this on the circle diagram. Now, draw a line from this number to the second number in your list:
Now draw a line from the second number in the list to the third number:

Draw lines from the third number to the fourth, and so on. Continue doing this, until you have reached the end of your list:

The patterns for all of the multiplication tables are shown below:
1, 8 and 10 Times Table:  | 2, 7 and 11 Times Table:  |
3, 6 and 12 Times Table:  | 4 and 5 Times Table:  |
9 Times Table:  |
Here is a display based on this activity.

A variation contributed by Caroline Searle…
As well as the patterns described, other patterns can also be made using these numbers. On squared paper, draw a line the length of the first number in the sequence, then turn the paper 90 degrees to the right, then carry on drawing the next line the length of the next number. Turn 90 degrees to the right again and draw the next line the length of the third number in the sequence. Keep turning and drawing the lines and you will come up with some fantastic patterns. This is also a good activity to do on Logo.

The photo resources below show different tools that might be used in Design Technology lessons. Here are some ideas for using them in the classroom:
If you have any other ideas for using these resources, please leave a comment below…


The Romans were famous for their roads, and this page describes how Roman roads were built and how you could use the topic in the classroom.
The Romans built roads so that the army could march from one place to another. They tried to build the roads as straight as possible so that the army could take the shortest route.
How the Road was Built…

1) First, the army builders would clear the ground of rocks and trees. They then dug a trench where the road was to go and filled it with big stones.
2) Next, they put in big stones, pebbles, cement and sand, which they packed down to make a firm base.,
3) Then, they added another layer of cement mixed with broken tiles.
4) On top of that, they then put paving stones to make the surface of the road. These stones were cut so that they fit together tightly.
5) Kerb stones were put at the sides of the road to hold in the paving stones and to make a channel for the water to run away.
Activities
1) Print the diagram below and photocopy it. Then ask the children to draw the diagram into their books and put the following sentences into the correct place on their diagrams.
| 1) At the bottom of the trench, the Romans put a layer of big stones. |
| 2) Broken stones, pebbles, cement and sand to make a firm base. |
| 3) Cement mixed with broken tiles. |
| 4) Paving stones formed the surface of the road. These were cut so they fit together tightly. |
| 5) Kerb stones at the sides held in the paving stones and made a channel for the water to run away. |

The above activity can also be found on the worksheet below.
2) If you have suitable materials (i.e. different sized rocks and pebbles, sand etc.), you could ask your children to make a model of the road, using the instructions above.
3) Give the children a copy of a map of Britain. Ask them to draw on the location of some Roman roads using the information below:
| This table shows where some Roman roads started and ended. Draw the roads on your map by joining the towns with a line. |
| London to Dover |
| Chester to York |
| London to Lincoln to York (this road was called ERMINE STREET) |
| Chester to Carlisle |
| Exeter to Dorchester to Silchester |
You could ask the children to find the location of more Roman roads using different reference sources, and they could also find out the Roman names for the towns and cities which are joined by the roads.

Expand your children’s Maths skills and have fun in the classroom with these great Maths games and puzzles. The PDF below includes:
Printables and game instructions are included. These are part of our bumper Maths Games Pack which includes even more games, puzzles, and activities!
Explore reflective symmetry with shapes!
Create mirrored patterns using simple shapes and blank spaces. A visual way to reinforce symmetry concepts.
Many thanks to Imam Bendjedidi for contributing this resource.
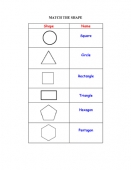
Download this free resource to help your children connect visual representations with text descriptions of 2D shapes. Perfect for enhancing their understanding and recognition skills!
Many thanks to Sherri for contributing this resource.
Children sit facing their partner and start counting in ones, taking it in turns. This activity is great to improve listening skills and co-operation / peer support.
This can be used with any numbers, e.g. counting in twos, tens, etc. I have also used it to say the days of the week, and months of the year. In fact, most maths topics can be incorporated.
My shape, your shape… listing properties of a shape with your partner is fun.
It’s great for teamwork and many children enjoy it as there is no recording! I have also sent this game home as homework and have had good feedback from parents. As the teacher, it also gives you time to walk around the class listening and finding out exactly who is able to do it and those that need more support.
Draw a big ladder onto a big piece of paper with the children’s names on little cards.
Every time a child achieves something in any area, they move up a step on the ladder, and every time they do something negative, they move down one step.
The incentive is to get to the top to win a secret prize!!!!
The greatest challenge in teaching a foreign language is getting students to actually learn to speak it. This is what I do:
I carry a clipboard with me or have it on my desk where I can quickly grab it. I have every student’s name in a grid (like a seating chart or alphabetically). Every time the student uses the target language outside of being called on or working within a particular lesson, the student gets a point. For example, if I overhear them asking another student to borrow a pencil IN THE TARGET LANGUAGE, they get one point – or more if it is a complicated phrase.
I always stand at the door to greet students during passing period with my clipboard. That is their chance to tell me they just came from math class, or they were going to a movie that night or anything else. I mark down points right away.
When grading at the end of a quarter, the students have to have earned a certain number of these points in order to KEEP the grade they earned on tests, homework, participation, etc. So, for example, they might need 20 points (earned throughout the marking period) to keep the “A” that they had earned on their regular work. And 15 points to hang on to their “B”, 10 points for the “C’ range.
Towards the end of each marking period, I usually dedicate the last few minutes of each class to letting them catch up on points with me by having mini-conversations. I also keep them updated on how many points they have as we move through the marking period.
I live in the town where I teach and often run into ex-students who thank me and tell me their class with me was the only one where they actually truly had to learn to think in the target language.
Many teachers think this method is too cumbersome, but once you get a rhythm going, it’s the easiest thing you’ll do in the classroom.